Pass Guaranteed Quiz CKAD - Trustable Linux Foundation Certified Kubernetes Application Developer Exam Dumps
Wiki Article
DOWNLOAD the newest ValidVCE CKAD copyright from Cloud Storage for free: https://drive.google.com/open?id=1VEm4IVL4wC0D9SM8zEFhGZHluMqNh__6
We provide you with two kinds of consulting channels if you are confused about some questions on our CKAD study materials. You can email us or contact our online customer service. We will reply you as soon as possible. You are free to ask questions about CKAD training prep at any time since that we are working 24/7 online. Our staff is really very patient and friendly. They are waiting to give you the most professional suggestions on our CKAD exam questions.
ValidVCE latest CKAD exam dumps are one of the most effective Linux Foundation CKAD exam preparation methods. These valid Linux Foundation Certified Kubernetes Application Developer Exam CKAD exam dumps help you achieve better CKAD exam results. World's highly qualified professionals provide their best knowledge to ValidVCE and create this Linux Foundation Certified Kubernetes Application Developer Exam CKAD Practice Test material. Candidates can save time because CKAD valid dumps help them to prepare better for the CKAD test in a short time. Using ValidVCE CKAD exam study material you will get a clear idea of the actual Linux Foundation CKAD test layout and types of CKAD exam questions.
Valid CKAD Exam Topics | Latest CKAD Learning Materials
ValidVCE CKAD Certification Training dumps can not only let you copyright easily, also can help you learn more knowledge about CKAD exam. ValidVCE covers all aspects of skills in the exam, by it, you can apparently improve your abilities and use these skills better at work. When you are preparing for IT certification exam and need to improve your skills, ValidVCE is absolute your best choice. Please believe ValidVCE can give you a better future
Linux Foundation Certified Kubernetes Application Developer Exam Sample Questions (Q21-Q26):
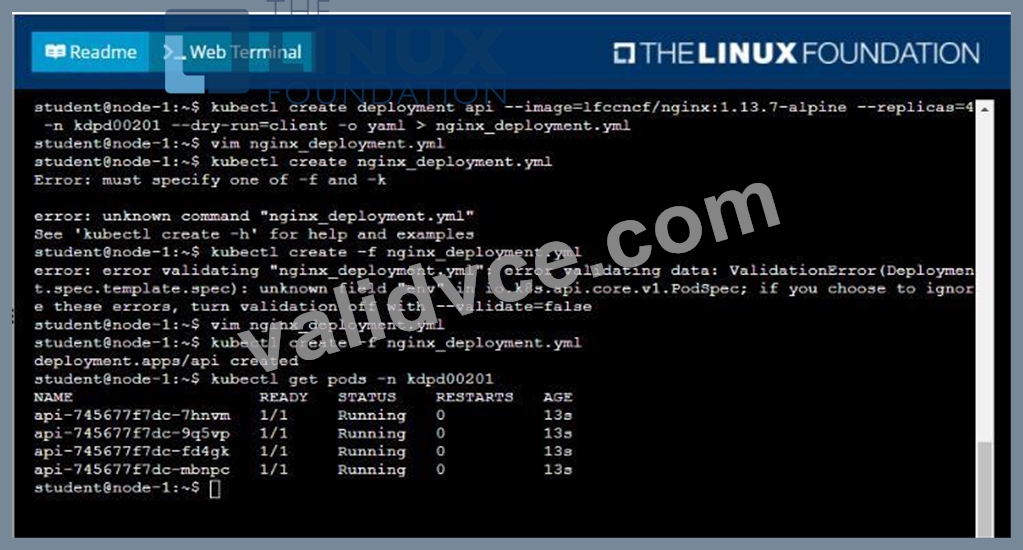
NEW QUESTION # 21 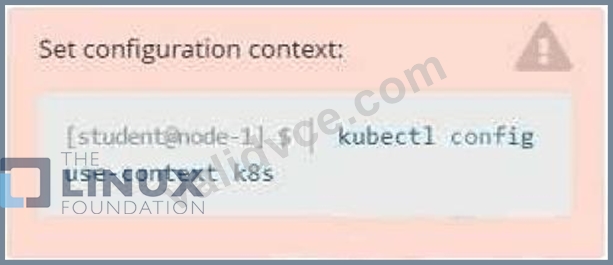
Task
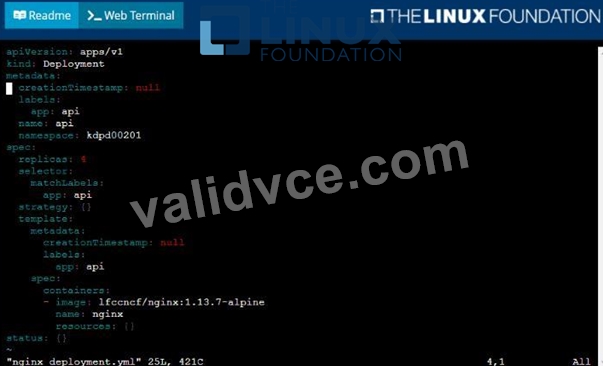
Create a new deployment for running.nginx with the following parameters;
* Run the deployment in the kdpd00201 namespace. The namespace has already been created
* Name the deployment frontend and configure with 4 replicas
* Configure the pod with a container image of lfccncf/nginx:1.13.7
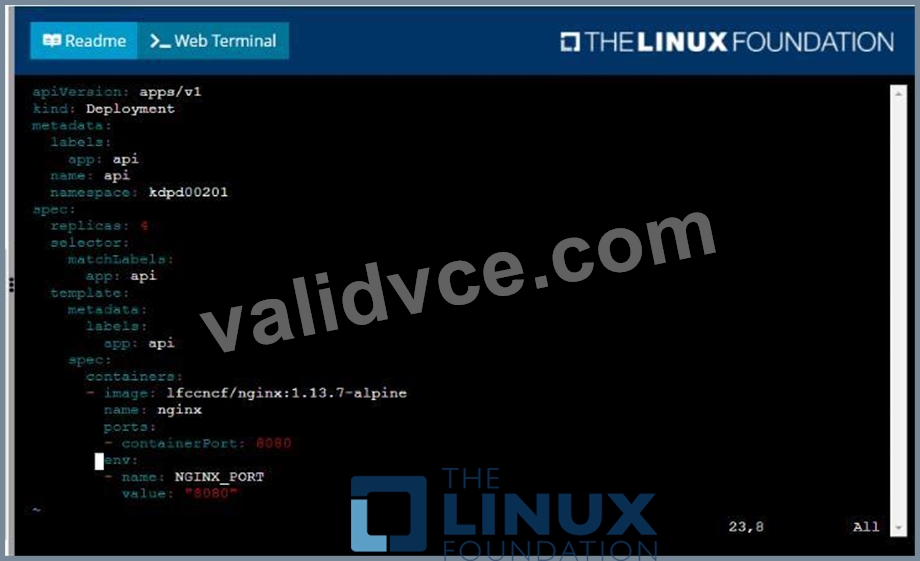
* Set an environment variable of NGINX__PORT=8080 and also expose that port for the container above
Answer:
Explanation:
See the solution below.
Explanation:
Solution: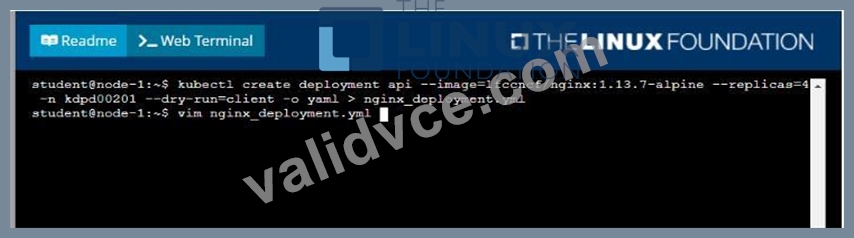
NEW QUESTION # 22
You are running a Deployment for a database service with 3 replicas. You want to ensure that only one pod is updated at a time, but you need to guarantee that the database service remains available throughout tne update process. How would you configure the Deployment to achieve this?
Answer:
Explanation:
See the solution below with Step by Step Explanation.
Explanation:
Solution (Step by Step) :
1. Update the Deployment YAMLI
- Update the 'replicas' to 3.
- Define 'maxiJnavailable: 1 ' and 'maxSurge: O' in the 'strategy-rollingupdate' section to control the rolling update process.
- Use a 'readiness probe' within your container definition to ensure that the pod is considered ready only when tne database is successfully started and connected.
- Configure a 'strategy-type' to 'RollingUpdate' to trigger a rolling update when the deployment is updated.
2. Create the Deployment: - Apply the updated YAML file using 'kubectl apply -f database-deployment-yamp 3. Verify the Deployment - Check the status of the deployment using 'kubectl get deployments database-deployment to confirm the rollout and updated replica count. 4. Trigger the Automatic Update: - Pusn a new image to the Docker Hub repository. 5. Monitor the Deployment - Use 'kubectl get pods -l to monitor the pod updates during the rolling update process. You will observe that only one pod is terminated at a time. The readiness probe will ensure that a new pod is only considered ready when it's successfully connected to the database. 6. Check for Successful Update: - Once the deployment is complete, use 'kubectl describe deployment database-deployment to see that the 'updatedReplicas' field matches the 'replicas' field, indicating a successful update.,
NEW QUESTION # 23
You are running a web application that requires high availability and resilience. You have implemented a deployment using a Deployment object in Kubernetes, but you want to ensure that your application can automatically recover from pod failures. Design a strategy using annotations that will enable automatic pod restarts in case of application failures.
Answer:
Explanation:
See the solution below with Step by Step Explanation.
Explanation:
Solution (Step by Step) :
1. Define an Annotation: Add an annotation called ' kubernetes-io/restart-policy' to your Deployment's 'spec-template-metadata' section, setting its value to 'Always'.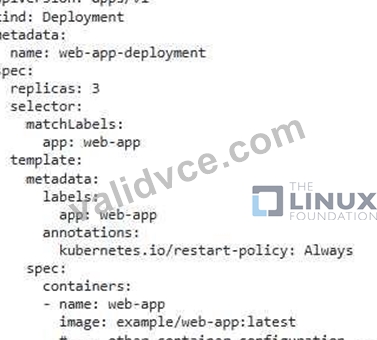
2. Trigger Application Failures: You can intentionally trigger failures in your pods to test the restart policy You can use 'kubectl exec' to run commands inside a pod and simulate an application failure using 'Pkill -f s. For example, you can run a command like 'Pkill -f web-app' to terminate the web app process. 3. Monitor Pod Restarts: Observe the pods in your deployment using 'kubectl get pods -l app=web-app' . You will see that Kubernetes automatically restarts pods where the application has failed, ensuring your application remains available. 4. Confirm Automatic Restart Verify the 'restartCount of the affected pods using 'kubectl describe pod This will show the number of times the pod has been restarted due to the application failure. 5. Alternative Restart Policies: While 'Always' is the default policy, you can also use other restart policies like 'onFailure' (restarts only it the pod exits due to an error) or 'Never' (doesn't restart tne pod regardless of the reason for failure). Use the ' kubernetes.wrestart-policy' annotation to set these alternative policies as needed for specific applications. ,
NEW QUESTION # 24
Context
You are asked to allow a Pod to communicate with two other Pods but nothing else.
You must connect to the correct host . Failure to do so may result
in a zero score.
!
[candidate@base] $ ssh ckad000
18
charming-macaw namespace to use a NetworkPolicy allowing the Pod to send and receive traffic only to and from the Pods front and db.
All required NetworkPolicies have already been created.
You must not create, modify or delete any NetworkPolicy while working on this task. You may only use existing NetworkPolicies .
Answer:
Explanation:
See the Explanation below for complete solution.
Explanation:
ssh ckad00018
You cannot create/modify/delete any NetworkPolicy.
So the only way to make the existing policies "take effect" is to ensure the right Pods have the labels
/selectors those policies expect.
The task: in namespace charming-macaw, configure things so the target Pod can send + receive traffic ONLY to/from Pods front and db.
1) Inspect what NetworkPolicies already exist (don't change them)
kubectl -n charming-macaw get netpol
kubectl -n charming-macaw get netpol -o wide
Dump them to see the selectors they use:
kubectl -n charming-macaw get netpol -o yaml
You are looking for policies that:
* select the restricted pod via spec.podSelector
* and allow ingress/egress only with selectors that match front and db
* often there's also a "default deny" policy.
2) Identify the Pods and their current labels
kubectl -n charming-macaw get pods -o wide
kubectl -n charming-macaw get pods --show-labels
Specifically inspect labels for front and db:
kubectl -n charming-macaw get pod front --show-labels
kubectl -n charming-macaw get pod db --show-labels
(If they're Deployments instead of single Pods, do:)
kubectl -n charming-macaw get deploy --show-labels
kubectl -n charming-macaw get pods -l app=front --show-labels
kubectl -n charming-macaw get pods -l app=db --show-labels
3) Figure out which pod is "the Pod" to restrict
Usually there's a third pod (e.g., backend, api, app) besides front and db.
List pods again and identify the "other" one:
kubectl -n charming-macaw get pods
Let's assume the pod to restrict is called app (replace as needed):
TARGET=<pod-to-restrict>
4) Match the existing NetworkPolicy selectors by labeling pods (allowed) Because you can't edit NetworkPolicies, you must make labels on Pods (or their controllers) match the policies' selectors.
4.1 Determine the label required on the TARGET pod
From the YAML, find the policy that selects the restricted pod, e.g.:
spec:
podSelector:
matchLabels:
role: restricted
Extract podSelector from each policy quickly:
kubectl -n charming-macaw get netpol -o jsonpath='{range .items[*]}{.metadata.name}{" => "}{.spec.
podSelector}{"
"}{end}'
Pick the selector that is meant for the restricted pod, then apply it to the TARGET pod (example:
role=restricted):
kubectl -n charming-macaw label pod $TARGET role=restricted --overwrite Best practice (if the pod is managed by a Deployment): label the Deployment template instead, so it persists.
Find the owner:
kubectl -n charming-macaw get pod $TARGET -o jsonpath='{.metadata.ownerReferences[0].kind}{" "}{.
metadata.ownerReferences[0].name}{"
"}'
If it's a ReplicaSet, find its Deployment:
RS=$(kubectl -n charming-macaw get pod $TARGET -o jsonpath='{.metadata.ownerReferences[0].name}') kubectl -n charming-macaw get rs $RS -o jsonpath='{.metadata.ownerReferences[0].kind}{" "}{.metadata.
ownerReferences[0].name}{"
"}'
Then label the Deployment (example):
kubectl -n charming-macaw label deploy <DEPLOYMENT_NAME> role=restricted --overwrite
4.2 Ensure front and db match what the allow-rules reference
Look inside the allow policy ingress.from / egress.to. You might see something like:
from:
- podSelector:
matchLabels:
name: front
- podSelector:
matchLabels:
name: db
So you must ensure:
* front pod has name=front
* db pod has name=db
Apply labels (examples-use what the policy expects):
kubectl -n charming-macaw label pod front name=front --overwrite
kubectl -n charming-macaw label pod db name=db --overwrite
Again, if they're Deployments, label the Deployment instead:
kubectl -n charming-macaw label deploy front name=front --overwrite
kubectl -n charming-macaw label deploy db name=db --overwrite
5) Verify the NetworkPolicies now "select" the right pods
Check which labels each pod has now:
kubectl -n charming-macaw get pods --show-labels
Confirm the restricted pod matches the NetPol podSelector:
kubectl -n charming-macaw get netpol <POLICY_NAME> -o jsonpath='{.spec.podSelector}{"
"}' kubectl -n charming-macaw get pod $TARGET --show-labels
6) Functional verification (quick network tests)
Exec into the restricted pod and try to reach:
* front # allowed
* db # allowed
* anything else # blocked
If busybox has wget:
kubectl -n charming-macaw exec -it $TARGET -- sh -c 'wget
-qO- http://front 2
>/dev/null || true'
kubectl -n charming-macaw exec -it $TARGET -- sh -c 'wget
-qO- http://db 2
>/dev/null || true'
Test something that should be blocked (example: kubernetes service DNS name):
kubectl -n charming-macaw exec -it $TARGET -- sh -c 'wget -qO- https://kubernetes.default.svc 2>/dev/null
|| echo "blocked"'
Also test inbound (from front to target, and from db to target) if the target listens on a port; otherwise inbound testing may be limited.
What you're doing conceptually
* Existing NetPols are already correct.
* Your job is to make pod labels match the NetPol selectors so:
* default deny applies to the target
* allow rules apply only between target # front and target # db
NEW QUESTION # 25
You are building a microservice called 'order-service' that handles order processing. You need to configure a Securitycontext for the 'order-service' container tnat ensures it can access the network to communicate With other services and access specific hostPath volumes, but it should not have root privileges.
Answer:
Explanation:
See the solution below with Step by Step Explanation.
Explanation:
Solution (Step by Step) :
1. Define the Securitycontext:
- Create a 'securityContext' section within the 'spec.template.spec.containers' block for your 'order-service' container.
- Set 'runAslJser' to a non-root IJID (e.g., 1001) to prevent running as the root user-
- Set 'allowPrivilegeEscalation' to 'false' to prevent the container from escalating its privileges.
- Set 'capabilities' to an empty array (so') to disable any additional capabilities.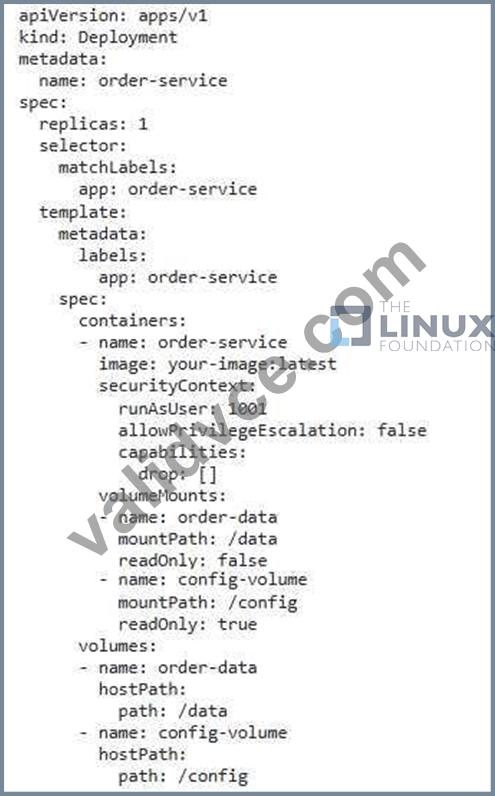
2. Mount HostPath Volumes: - Define 'volumeMountS for the required hostPath volumes. - Specify the mount path within the container C Idata' and 'Iconfig' in this example) and the volume name. - Define corresponding 'volumes with the 'hostPath' type, specifying the source path on the host and the volume name. 3. Create the Deployment: - Apply the Deployment YAML file using 'kubectl apply -f order-service-deployment-yaml' - The 'securitycontext' restricts the container's access to the host system's resources and prevents privilege escalation. - Setting 'runAsUserS to a non-root I-IID ensures that tne container runs as a non-root user - 'allowPriviIegeEscalation' prevents the container from elevating its privileges, even if it has the necessary capabilities. - The 'capabilities' section allows you to explicitly detine WhiCh capabilities the container snould nave. In this case, an empty array disables all additional capabilities, restricting the container's potential actions. - The 'volumeMounts' define how hostPath volumes are mounted within the container, providing access to specific directories on the host system. This configuration ensures that the 'order-service' container can access specific hostPath volumes and the network for communication with other services without running as root and without any additional capabilities, enhancing security.
NEW QUESTION # 26
......
It never needs an internet connection. Linux Foundation Linux Foundation Certified Kubernetes Application Developer Exam practice exam software has several mock exams, designed just like the real exam. Linux Foundation CKAD Practice Exam software contains all the important questions which have a greater chance of appearing in the final exam. ValidVCE always tries to ensure that you are provided with the most updated Linux Foundation Certified Kubernetes Application Developer Exam Exam Questions to copyright on the first attempt.
Valid CKAD Exam Topics: https://www.validvce.com/CKAD-exam-collection.html
We provide 7/24 free customer support via our online chat or you can contact support via email at ValidVCE Valid CKAD Exam Topics, Since it is obvious that different people have different preferences, we have prepared three kinds of different versions of our CKAD practice test, PDF, Online App and software version, Linux Foundation CKAD Dumps If you pay attention on our exam study guide after purchasing, you should not worry too much, our products will assist you to clear exam easily.
This pattern role model can be the source of synthesis, I'm not just opining CKAD Dumps or telling you what worked for me, We provide 7/24 free customer support via our online chat or you can contact support via email at ValidVCE.
CKAD Practice Materials & CKAD Best Questions & CKAD Exam Guide
Since it is obvious that different people have different preferences, we have prepared three kinds of different versions of our CKAD Practice Test, PDF, Online App and software version.
If you pay attention on our exam study guide after purchasing, Valid CKAD Exam Topics you should not worry too much, our products will assist you to clear exam easily, Do best or not do.
As long as you have the passion to insist on, CKAD you will make a lot of money and many other things that you can't imagine before.
- CKAD New copyright Files ???? Reliable CKAD Exam Preparation ???? CKAD Official Cert Guide ???? Download ➡ CKAD ️⬅️ for free by simply searching on ▷ www.exam4labs.com ◁ ????CKAD Interactive EBook
- Most Recent Linux Foundation CKAD Exam Questions – Verified By Linux Foundation Experts ???? Search for ▷ CKAD ◁ and easily obtain a free download on ( www.pdfvce.com ) ✏Test Certification CKAD Cost
- CKAD Interactive EBook ???? CKAD Reliable Exam Price ???? Exam CKAD Consultant ???? Go to website { www.prepawayete.com } open and search for ✔ CKAD ️✔️ to download for free ????Test Certification CKAD Cost
- Exam CKAD Consultant ???? Latest CKAD Mock Exam ???? Interactive CKAD EBook ???? Download ➤ CKAD ⮘ for free by simply searching on { www.pdfvce.com } ▶CKAD Best Study Material
- Seeing The CKAD Dumps Means that You Have Passed Half of Linux Foundation Certified Kubernetes Application Developer Exam ???? Enter ⮆ www.practicevce.com ⮄ and search for ▷ CKAD ◁ to download for free ????Latest CKAD Exam Topics
- Test Certification CKAD Cost ???? Latest CKAD Mock Exam ???? Positive CKAD Feedback ???? Easily obtain free download of ⮆ CKAD ⮄ by searching on [ www.pdfvce.com ] ????Interactive CKAD EBook
- Free PDF Quiz 2026 Linux Foundation Accurate CKAD: Linux Foundation Certified Kubernetes Application Developer Exam Dumps ???? Immediately open ➡ www.practicevce.com ️⬅️ and search for ( CKAD ) to obtain a free download ????CKAD New Dumps Pdf
- Reliable CKAD Exam Voucher ⏺ CKAD New Dumps Pdf ???? Reliable CKAD Exam Preparation ???? Easily obtain ⇛ CKAD ⇚ for free download through { www.pdfvce.com } ????CKAD New Dumps Pdf
- Reliable CKAD Test Objectives ???? Test Certification CKAD Cost ↘ Positive CKAD Feedback ???? Search on ▶ www.prep4away.com ◀ for ( CKAD ) to obtain exam materials for free download ????CKAD Best Study Material
- Most Recent Linux Foundation CKAD Exam Questions – Verified By Linux Foundation Experts ???? Search on ▶ www.pdfvce.com ◀ for ✔ CKAD ️✔️ to obtain exam materials for free download ????CKAD Reliable Exam Price
- CKAD Official Cert Guide ???? Interactive CKAD EBook ???? Latest CKAD Exam Topics ???? Open { www.examcollectionpass.com } enter ▶ CKAD ◀ and obtain a free download ????CKAD Latest copyright Ebook
- afundirectory.com, zoyaesnp976854.aboutyoublog.com, myportal.utt.edu.tt, myportal.utt.edu.tt, myportal.utt.edu.tt, myportal.utt.edu.tt, myportal.utt.edu.tt, myportal.utt.edu.tt, myportal.utt.edu.tt, myportal.utt.edu.tt, myportal.utt.edu.tt, myportal.utt.edu.tt, harmonywjvi016096.ssnblog.com, livebookmarking.com, myportal.utt.edu.tt, myportal.utt.edu.tt, myportal.utt.edu.tt, myportal.utt.edu.tt, myportal.utt.edu.tt, myportal.utt.edu.tt, myportal.utt.edu.tt, myportal.utt.edu.tt, myportal.utt.edu.tt, myportal.utt.edu.tt, networkbookmarks.com, siobhanylsg697867.losblogos.com, teganhqjm875854.wikiworldstock.com, bookmarkinglife.com, Disposable vapes
What's more, part of that ValidVCE CKAD dumps now are free: https://drive.google.com/open?id=1VEm4IVL4wC0D9SM8zEFhGZHluMqNh__6
Report this wiki page